This is my second post dealing with the topic of classroom libraries. The first post was on
Building a Classroom Library, and the final post in the series will be on Labeling and Tracking a Classroom Library. This series of posts was inspired by a recent series of in-depth classroom library posts over at
The Thinker Builder on classroom libraries.
Organizing a Classroom Library: macro scale
You will want to carve out space for your classroom library. Corners or nooks have great potential, as they already serve to help define the space. Depending on the size of your room, you can also use bookshelves themselves to define space or segment the room. Michael, over at
The Thinker Builder, has a very detailed post with awesome graphics to help you visualize your space. Click the pin below to check it out.
If you are willing to put in the work, you can find assemble-yourself bookshelves fairly cheaply. (Fair warning: a few days after assembling several bookshelves in my classroom I discovered a gigantic liquid-filled blister on my palm. It wasn't until I was back in my room assembling the last bookshelf that the mystery was solved!) Consider rotating book racks or displays for tight corners or small spots.
In addition to bookshelves, there are many other inventive ways to display books and maximize the space that you have. Face-out displays always attract readers' interest. You can use holders for displaying dishware to hold books, as shown above. Gutters make an excellent rail for securing books for display and work especially well if you have a extra wall or wall space that you wanted to utilize. The pin below has step-by-step directions for one method.
Of course, do not forget a rug to anchor the space, and think about ways to give students choice in seating and reading. Bean bags, couches, and other chairs are always popular. Plants and soft lighting fixtures also add a warm touch. Once you have the place established, it's time to move down to organizing on the micro scale.
Organizing a Classroom Library: micro scale
Once you have the location and structure of your classroom library established, the next step is organizing the books.
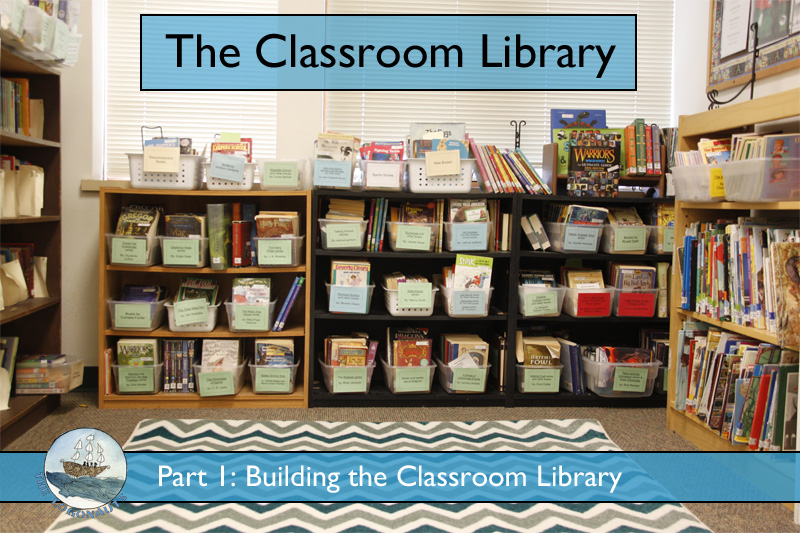
Baskets and bins are a popular method for organizing books in classroom libraries, as they allow books to be displayed face-out and to keep series, authors, or subjects together. The majority of paperbacks in my library are kept in clear plastic bins - the size sold to hold a pair of shoes. These are fairly inexpensive and can often be bought in bulk. They are also extremely durable and re-usable.
Bin labels are attached by means of Velcro, making it easy to swap labels as needed. (Sticky-backed Velcro adheres well to plastic bins.) I print labels on card stock and use contact paper to laminate the fronts. (I stopped using the laminator on both sides after realizing that sticky-backed Velcro does
not adhere to lamination plastic and neither do most craft glues.) The majority of labels make it through the school year, limiting waste and simplifying the process each year. (I will talk about spine labels, book plates, and series lists in Part 3: Labeling and Tracking a Classroom Library.)
There are many different ways to organize books within your bins. The most common methods include sorting bins by author, series, genre, reading level, or topic. The majority of bins in my third grade classroom are books by author or series (as some series, like
the 39 Clues are written by multiple authors). Similar series or authors can be grouped together in a single bin (
Clementine shares space with
Sophie).
Genre and topic bins include mysteries, books about dragons, talking animal books, realistic animal books, and sports books, among others. I also have dedicated bins for new books, award winning books, and recommended books (students periodically share and recommend books to each other, which are added to the recommended book bin). The colors of the labels distinguish genres to scaffold these conversations later in the year.
There will always be books that do not fit into the bins that you have created. Rather than create sad-looking book bins with only a single book or two, I have an additional bookshelf for these non-binned books. These books are organized alphabetically by author. I have found that students are generally less-likely to browse the non-binned books, so I try to make sure that these books rotate through genre or topic bins or are introduced through book talks.
Picture books are too large to fit in the shoe-sized bins, so they are stored in taller shelves. Traditional tales are labeled with colored spine labels to distinguish the continent of origin. Picture books are divided into broad categories: poetry, nonfiction/informational, traditional tales, and everything else. If you prefer separating your picture books, you can buy over-sized magazine holders to keep them sorted.
Summary: organizing your classroom library
Do let yourself get overwhelmed! Organization is the backbone of a successful library, but that does not mean that you have to do it all at once. Start with the macro part - establish a place for your library and any necessary furniture. As for micro, start with some of the most popular books, authors, or series in your room. Work outward from there, and see where it takes you. Or, get your students involved - ask them what books should go where or have them make labels for their favorites. You might be surprised at just how fast it all comes together!
Next week, Part 3 of this series will look at Labeling and Tracking Your Classroom Library.


